If you are using Windows 10, and you notice that the Windows Module installer Worker process has a large part of your CPU, then you certainly not the only one. I have seen that many Windows users are reporting this problem. But the good news is that it is possible to fix this high disk/cpu usage caused by Windows Modules Installer Worker.
In this article, I will describe how to fix high CPU usage of the Windows Modules Installer Worker on Windows 10, 8 and 7 in a simple way using the step-by-step guide provided.
What is Windows Modules Installer Worker?
Windows Modules Installer Worker (TiWorker.exe) is a Windows Update Service that appears for new updates and installs it on your computer. In other words, as soon as your computer system is evaluating the Windows update or installing an update, this process will probably run automatically.
How To Fix Windows Modules Installer Worker High CPU Usage?
Preventing the Windows Module Installer Worker from working is not a solution to your high CPU usage problem as updates are essential. Instead, I have compiled 2 working and simple solutions for you. You do not need a bag full of computer skills or tools to use them. Just follow the step-by-step guide that I am providing you. Let’s go further to the solutions for the problem of high CPU usage of Windows Modules Installer Worker.

Here are two solutions that you can try to correct this problem. You may not need to try both; If Method 1 does not work, then you can try Method 2 to solve the problem.
Method 1: Stop and disable the Windows Update service
This method works according to the principle of changing the Windows Updates utilities from Automatic to Manual. So that it stop continually demanding power. The main drawback of this method is that you should keep looking for Windows updates manually (weekly / monthly). Follow these steps to use this solution:
Here is how you can stop and disable the Windows update service:
Step 1: On your computer, press the Windows logo key and at exactly the same time to invoke the Execute box.
Step 2: Type services.msc and click OK.

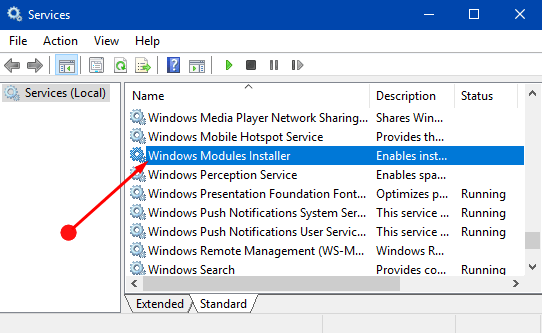
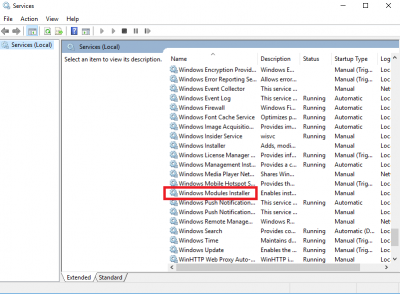
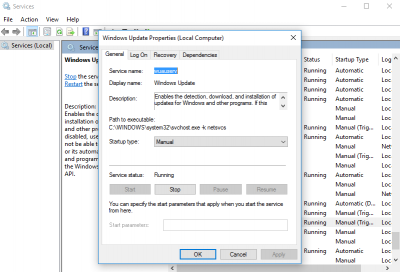
Step 3: You must find the Services window. Double-click Windows Update.
Step 4: Set your startup type to disable and click Stop. Then click Apply> Accept.

Step 5: The use of the CPU on your computer should return to normal.
After the successful application of this method, the use of the Windows Modules Installer Worker CPU would return to its normal value. This is the most accurate and easy method to solve this problem.
Method 2: Set Your Connection as Metered
This method uses measured connections to prevent Windows from automatically downloading and installing updates. A measured connection is basically a connection with a limited data plan. To use this method, you must configure all your connections as measures so that Windows can not obtain the updates automatically. This is the fastest solution to the high CPU usage problem of Windows Modules Installer Worker. I will explain the procedure separately for Wifi and Ethernet users.
Follow these steps to use this solution:
Case 1: If You are using a Wi-Fi network
If you are using Wi-Fi Internet, follow the given method to get rid of high CPU usage error.
Step 1: Go to Start> Settings> Networks and Internet> Wi-Fi. Then click on Advanced Options.

Step 2: Check Set as a measured connection.

Case 2: If you are using an Ethernet network
Ethernet users can resolve this error by making some changes in the Windows Registry Editor.
Step 1: On your computer, press the Windows logo key and at exactly the same time to invoke the Execute box.
Step 2: Type Regedit and click OK.
Step 3: Click Yes when requested by UAC (User Account Control).
Step 4: In the open window, then visit
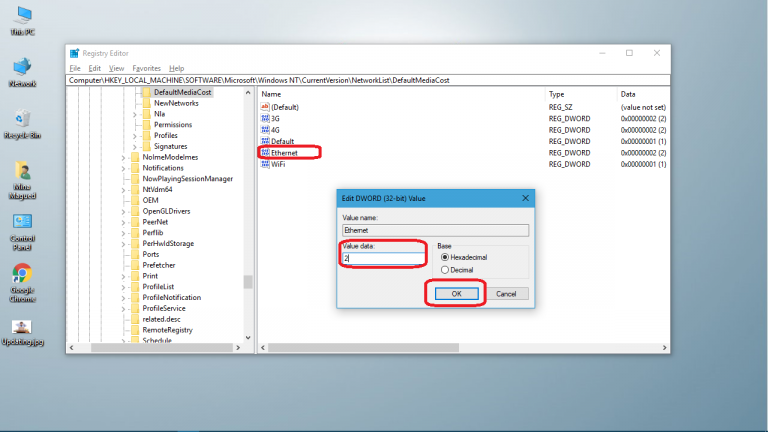
Step 5: HKEY_LOCAL_MACHINE> SOFTWARE> Microsoft> WindowsNT> CurrentVersion> NetworkList> DefaultMediaCost

Step 6: Next, right-click on DefaultMediaCost and choose Permissions.

Step 7: Click on Add. Next, type your username in Enter the names of the objects to choose from and then click on Verify names. Click on OK
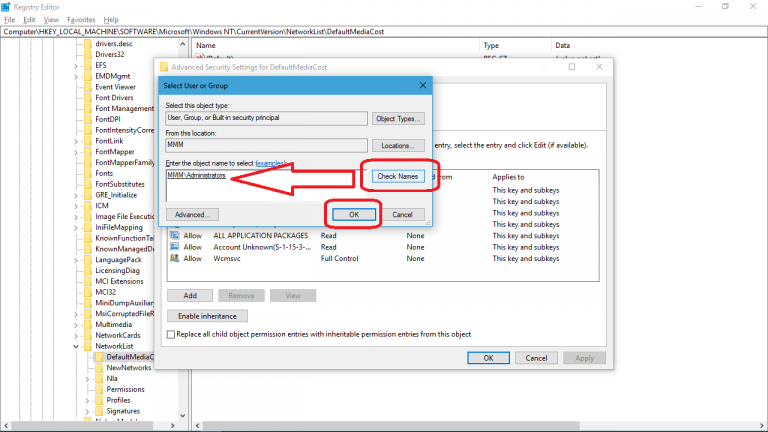
Step 8: Click on the user you just entered, then log in to enable for Full Control. Click on OK

Step 9: Double click on Ethernet. Then set your valuable information in two. Click on OK and close the Regedit Editor window.
Step 10: Restart your computer.
After the successful application of this method, Windows Modules Installer Worker will not be able to download and install the updates without your permission (automatically). Therefore, your CPU usage would return to normal values.
You can follow the method by watching the given video;
These are the 2 best methods to solve the problem of high CPU usage of the Windows Modules Installer Worker. Now you know how to solve this problem in a simple way. Remember that if you are preventing Windows from updating automatically, you should continue updating them from time to time. The update is a key aspect.